Automated Class Scheduling System Capstone Project Document
Introduction
One of the remarkable and much-known products of technology advancement is the conversion of the manually-operated system into an automated system. Automation produces a terrific influence in the lives of man, significantly within the field of industry, business, medicine, and education.
Bohol Island State University-Main Campus as an educational institution offers services to the clientele more particularly the students, community, and stakeholders. The primary operations of the school are non-stop starting from pre-enrolment up to the post-graduation activities. These activities require money, labor force and time.
It’s an incontrovertible fact that arranging class schedules, teacher’s load and room utilization for the students and faculty in every department is one of the many actions that every division heads must prepare before classes start. But the school used the manual way of preparing the class schedule. With the manual system, more time and labor force is required to plot, arrange, and revise the class schedules, room utilization and instructors’ load provided by the department heads. With these problems, the researchers had come up an idea of creating an automated class scheduling system using MySQL database and PHP programming language. Through this advancement, errors in operations have been minimized and time and manpower have been conserved.
Objectives
This study aims to design an automated class scheduling system and test its functionality in terms of speed, accuracy, data handling, security, stability, and adaptability in making class schedules. This study was conducted in Bohol Island State University-Main Campus, Tagbilaran City during the second semester of the school year 2010-2011.
Specifically, this study aims to answer the following questions:
1. What is the profile of the respondents in terms of:
a. Expert Instructors
a. 1. Educational Qualification
a.2. Position
a.3. Number of Years in Service
a.4. Number of Years Experienced Teaching Computer Programming
b. Expert Instructors
b.1. Educational Qualification
b.2. Position
b.3. Number of Years in Service
b.4. Number of Years Experienced in Making Class Schedules
2. What are the problems being encountered in the making of class schedules using the manual class scheduling system?
3. What are the descriptions of the main features of the automated class scheduling system in terms of:
a. Preparation
b. Design
c. Operating procedure
4. What is the level of functionality of the newly designed automated class scheduling system in terms of:
a. Speed
b. Accuracy
c. Security
d. Data Handling
e. Stability
f. Adaptability
Methodology
1. Resources
MySQL Database was used for the database of this system. It was being integrated with PHP and HTML programming languages for the Graphic UserInterface.
2. Hardware and Software Requirements
This system might be put in a Home windows working system or larger. A physical memory requirement of at the very least 512 MB memory with at the very least 20 MB of free disk area can also be required.
3. Operating Procedures
This is the administrator login form. Before the administrator can log in, he should enter the username and password that are predefined or current within the system’s database. After the administrator has a login, he can add one other user of the system within the user’s tab and have an equal power with him as administrator.

Homepage
is the Home page. After the administrator has a login, this web page appears. Accessibility to all the opposite tabs which corresponds to the totally different pages of the system, such as system tab, teacher tab, college students tab, schedules tab, user tab, notifications tab, schedule conflicts, and help tab begins right here.
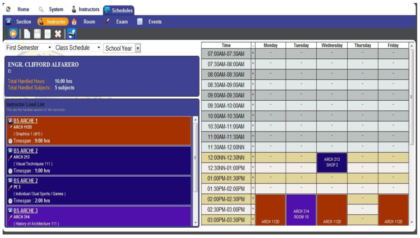
Instructors schedule
shows the schedule of the instructor. This schedule relies on the schedule made within the Section Tab. All the topics dealt with by the instructor might be displayed right here with their corresponding units. The time and the room that the instructor conducts his class may even be displayed. The schedules displayed on this web page is already conflict-free.
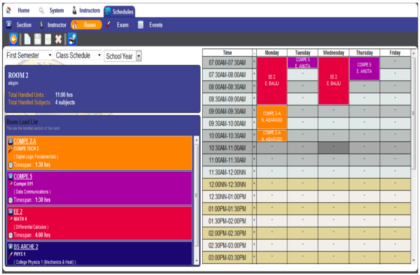
Room schedule
This web page helps one to view the schedule of various rooms. The instructors who’re dealing with particular topics on sure rooms are listed. One can not create, edit or replace the schedule aside from the one in charge to make the schedule. This schedule relies on the schedules of the instructors and the section. The room schedule is automatically created with the section and instructors’ schedule.
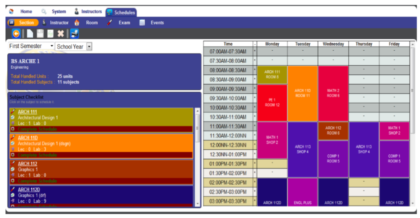
Section schedules
Shows the section schedules whereby can create, edit or replace schedule of the chosen section of classes. The black-colored boxes that appear in the schedule side represent the conflicting data either a conflict with the room to be used or with the instructor who is handling the subject. If the back tab is clicked, the schedule that has no conflicts between the room and the instructors will be displayed. Thus the schedule presented provides final accommodation of room and final assignment of instructor.
Operations Manual
After a correct username and password have been entered into the system, the user can perform any of the functions that follow:
Adding a New User
Go to the ‘Home’ then click on the ‘User’ button and click the ‘New User’ to add a new user. Fill up the required details for the new user and save.
Edit the User Details
Go to the ‘Home’ then click on the ‘User’ button and click the user you want to update. Fill up the new details for the user and save.
Remove a User
Go to the ‘Home’ then click on the ‘User’ button and click the user you want to remove. Click the ‘Delete User’ button, a confirmation box will pop-up and click ‘Proceed’ to remove the user.
Adding a New Course
Go to the ‘System’, viewing the course tab as default and click the ‘New Course’ to add a new course. Fill up the required details and save.
Update a Course.
Go to the ‘System’, viewing the course tab as default and click the ‘Course’ you want to update. Fill up the new details for the course and save.
Remove a Course.
Go to the ‘System’, viewing the course tab as default and click the ‘Course’ you want to remove. Click the ‘Delete Course’ button, a confirmation box will pop-up and click ‘Proceed’ to remove the course.
Adding a New Section.
Go to the ‘System’, viewing the course tab as default and click the course where you want to add a new section. Click the ‘New Section’ button to add a new section under the course selected. Fill up the required details for the new section and save.
Update a Section.
Go to the ‘System’, viewing the course tab as default and click the course where you want to update a section. Click the section that you want to update under the course selected. Fill up the new details for the section and save.
Remove a Section.
Go to the ‘System’, viewing the course tab as default and click the course where you want to remove a section. Click the section that you want to remove under
The course selected.
Click the ‘Delete Section’ button, a confirmation box will pop-up and click ‘Proceed’ to remove the section. Adding a New Department. Go to the ‘System’, viewing the course tab as default and click on any courses displayed. Viewing the course details, click on the word ‘Department’ to view the department list. Click the ‘New Department’ button to add a new department. Fill up the required details for the new department and save.
Update a Department.
Go to the ‘System’, viewing the course tab as default and click on any courses displayed. Viewing the course details, click on the word ‘Department’ to view the department list. Click the department that you want to update. Fill up the new details for the department and save.
Remove a Department.
Go to the ‘System’, viewing the course tab as default and click on any courses displayed. Viewing the course details, click on the word ‘Department’ to view the department list. Click the department that you want to be removed. Click the ‘Delete Department’ button, a confirmation box will pop-up and click ‘Proceed’ to remove the department.
Adding a New Subject.
Go to the ‘System’ and click on the ‘Subject’ tab to view the subject list. Click the ‘New Subject’ to add a new subject. Fill up the required details for the new subject and save.
Update a Subject.
Go to the ‘System’ and click on the ‘Subject’ tab to view the subject list. Click the subject that you want to update. Fill up the new details for the subject and save.
Remove a Subject.
Go to the ‘System’ and click on the ‘Subject’ tab to view the subject list. Click on the subject that you want to be removed. Click the ‘Delete Subject’ button, a confirmation box will pop-up and click ‘Proceed’ to remove the subject.
Adding a New Room
Go to the ‘System’ and click on the ‘Room’ tab to view the room list. Click the ‘New Room’ to add a new room. Fill up the required details for the new room and save. Update a Room. Go to the ‘System’ and click on the ‘Room’ tab to view the room list. Click the room that you want to update. Fill up the new details for the room and save.
Remove a Room.
Go to the ‘System’ and click on the ‘Room’ tab to view the room list. Click the room that you want to be removed. Click the ‘Delete room’ button, a confirmation box will pop-up and click ‘Proceed’ to remove the room.
Adding a New Building
Go to the ‘System’ and click on the ‘Room’ tab to view the room list. Click on any room in the room list, click on the word ‘Building’ to view the building list. Click the ‘New Building’ button to add a new building. Fill up the required details for the new building and save.
Update a Building.
Go to the ‘System’ and click on the ‘Room’ tab to view the room list. Click on any room in the room list, click on the word ‘Building’ to view the building list. Click the building that you want to update. Fill up the new details for the building and save.
Remove a Building.
Go to the ‘System’ and click on the ‘Room’ tab to view the room list. Click on any room in the room list, click on the word ‘Building’ to view the building list. Click the department that you want to be removed. Click the ‘Delete Department’ button, a confirmation box will pop-up and click ‘Proceed’ to remove the department.
Adding a Subject in each Course
Go to the ‘System’ and click on the ‘Checklist’ tab to view the course list. Select a course where you want to add a new subject. Select the school year to view the semester list. Viewing the semester list, click the ‘New Checklist Subject’ button to add a subject during the semester selected. Fill up the required details for the subjects and save.
Update a Subject in each Course
Go to the ‘System’ and click on the ‘Checklist’ tab to view the course list. Select a course where you want to update subjects. Select the school year to view the semester list. Viewing the semester list, click the subject that you want to update under the semester selected. Fill up the new details for the subjects and save.
Remove a Subject in each Course.
Go to the ‘System’ and click on the ‘Checklist’ tab to view the course list. Select a course where you want to remove a subject. Select the school year to view the semester list. Viewing the semester list, click the subject that you want to remove during the semester selected. Click the ‘Delete Checklist Subject’ button, a confirmation box will pop-up and click ‘Proceed’ to remove the subject.
Adding and Information in the Checklist.
Go to the ‘System’ and click on the ‘Checklist’ tab to view the course list. Click on the ‘Information’ tab and fill up the required information then save.
Adding a New Instructor.
Go to the ‘Instructor’ to view the instructor list. Click the ‘New Instructor’ to add a new instructor. Fill up the required details for the new instructor and save.
Update an Instructor.
Go to the ‘Instructor’ to view the instructor list. Click the instructor that you want to update. Fill up the new details for the instructor and save.
Remove an Instructor.
Go to the ‘Instructor’ to view the instructor list. Click the instructor that you want to remove. Click the ‘Delete Instructor’ button, a confirmation box will pop-up and click ‘Proceed’ to remove the instructor.
Adding a Class Schedule.
Go to the ‘Schedule’, viewing the section tab as default and click a section that you want to add a new class schedule. After selecting a section, now select the semester where you want to add the class schedule. To add a class schedule, click on the subject available below the section detail box. Select an instructor for the subject and a room for the class schedule. Select the time schedule in the timetable by highlighting the cell. Click the ‘Schedule (Lec)’ button for the lecture schedule and ‘Schedule (Lab)’ for the laboratory schedule. To go back to the subject list click the ‘Back’ button.
Update a Class Schedule.
Go to the ‘Schedule’, viewing the section tab as default and click a section that you want to update a class schedule. After selecting a section, now select the semester where you want to update a class schedule. To update a class schedule double-click on the subject in the timetable where you want to update. Select a new instructor to change the instructor and a new room for the new schedule. Select a new time schedule on the timetable by highlighting a new cell. Click the ‘Update (Lec)’ to update the lecture schedule and ‘Update (Lab)’ for the laboratory schedule. To go back to the subject list click the ‘Back’ button.
Remove a Class Schedule.
Go to the ‘Schedule’, viewing the section tab as default and click a section that you want to remove a class schedule. After selecting a section, now select the semester where you want to remove a class schedule. To remove a class schedule double-click on the subject in the timetable where you want to remove. And click the ‘Delete’ button to remove the schedule. To go back to the subject list click the ‘Back’ button.
Viewing and Printing an Instructor’s Schedule.
Go to the ‘Schedule’ and click the ‘Instructor’ tab. Showing the instructor list, click on the instructor that you want to view a schedule. Select a semester that you want to view the schedule of the instructor. Select a type of schedule that you want to view. Click the ‘Print Schedule’ button to have a printout copy of the instructor schedule.
Viewing and Printing a Room Schedule.
Go to the ‘Schedule’ and click the ‘Room’ tab. Showing the room list, click on the room that you want to view a schedule. Select a semester that you want to view the schedule of the room. Select a type of schedule that you want to view. Click the ‘Print Schedule’ button to have a printout copy of the room schedule.
Adding an Exam Schedule.
Go to the ‘Schedule’ and click the ‘Exam’ tab. Click a section that you want to add an exam schedule. After selecting a section, now select the semester where you want to add the exam schedule. To add an exam schedule click on the subject available below the section detail box. Select an instructor for the subject and a room for the class schedule. Select the time schedule in the timetable by highlighting the cell. Click the ‘Schedule (Exam)’ button for the exam schedule. To go back to the subject list click the ‘Back’ button.
Update an Exam Schedule.
Go to the ‘Schedule’ and click the ‘Exam’ tab. Click a section that you want to update an exam schedule. After selecting a section, now select the semester where you want to update an exam schedule. To update an exam schedule double-click on the subject in the timetable where you want to update. Select a new instructor to change the instructor and a new room for the new schedule. Select a new time schedule on the timetable by highlighting a new cell. Click the ‘Update (Exam)’ to update the exam schedule. To go back to the subject list click the ‘Back’ button.
Remove an Exam Schedule.
Go to the ‘Schedule’ and click the ‘Exam’ tab. Click a section that you want to remove an exam schedule. After selecting a section, now select the semester where you want to remove an exam schedule. To remove an exam schedule double-click on the subject in the timetable where you want to remove. And click the ‘Delete’ button to remove the schedule. To go back to the subject list click the ‘Back’ button.
Results and Discussion
The respondents who’re accountable for making the category schedules are serving as instructors within the establishment for about 5 years and beneath. The vary of the variety of years they skilled in making schedules is from 1 to six years. From the respondents’ information, it came upon that 100% of them skilled conflicting schedules which can be arduous to examine and consumes extra supplies akin to papers, pencils, and others because the topmost drawback being encountered throughout the preparation of their respective class schedules using the manual system.
The professional respondents rated the performance of the automated class scheduling methods by way of velocity, accuracy, information dealing with, stability, and flexibility as “Very Good”. Primarily based on the information gathered from the eight respondents, the typical weighted imply for the performance of the 2 methods by way of velocity, accuracy, information dealing with, stability, and flexibility are proven below:
a. Automated. The average weighted mean is 3.779 which is described as “Very Good”.
b. Manual. The average weighted mean is 2.602 which is described as “Good”.
The research came upon that there’s a vital distinction between the automated class scheduling system and the manual class scheduling system by way of their performance and acceptability stage. That is attested with the typical weighted imply of 3.19 or Good (primarily based on the specialists’ notion) and 3.779 or Very Good (primarily based on the respondents’ notion) for the automated system and 2.602 or Good (primarily based on the respondents’ notion) for the manual system. It came upon there was no single item for the manual class scheduling system that was being rated greater than the automated class scheduling system.
Conclusions and Recommendations
Conclusions
The manual system is adaptable and useful in the making of class schedules. However, the automated class scheduling system is more functional because of the distinctive performance in the aspect of speed, project design, accuracy and stability of the system in the preparation of class schedules, room schedules and instructors’ load. With these features, the automated system can really solve the primary problems being encountered during the class schedule preparation.
Recommendations
1. Add ‘School Year’ and ‘Term’ in the database for easy retrieval of data on the specific school year and term being entered by the user.
2. Enhance the code of the program that will improve its aesthetics.
3. It must be used on other campuses of Bohol Island State University provided that there is an orientation conducted to the end-users on how to operate the system.
Credit:
Jeralyn M. Gamale
Edward C. Anuta
Zina D. Sayson


Leave A Comment
You must be logged in to post a comment.